
Sync Secrets to K8s with External Secrets Operator
Deeper DiveFor more in-depth information, check out our detailed documentation on the following topics:
External Secrets Operator
Need any help?If something in this tutorial isn't working as expected, feel free to contact our support team via Slack.
Below is a text-only guide for users based on the above video
Why use External Secrets Operator?
External Secrets Operator (ESO) is an open source project that makes it easy for users to fetch secrets from external secrets management tools and inject them into etcd as Kubernetes Secrets.
Many organizations have already put in a lot of effort to work with Kubernetes Secrets for their current environment and don’t want to change their workflows, which can be anything from updating small components within automation to large scale refactoring of code.
With ESO and Akeyless, organizations that are already using Kubernetes Secrets will have a more secure method for storing and managing the full lifecycle of their secrets with strong encryption.
Prerequisites
- The minimum supported version of Kubernetes is 1.16.0. Users still running Kubernetes v1.15 or below should upgrade to a supported version before installing external-secrets.
- Helm needs to be installed on your machine.
Install External Secrets Operator with Helm
Run the following two commands to add the external-secrets repo and then install it on your machine.
helm repo add external-secrets https://charts.external-secrets.ioYou have the option to install external-secrets in the default namespace or you can create one with the additional information -n external-secrets --create-namespace.
helm install external-secrets external-secrets/external-secretsSecretStore
The next step is to create a SecretStore resource on your cluster in order to authenticate with Akeyless.
There are two methods for creating the SecretStore:
Method 1: Create a K8s Secret
The first option is to create a secret inside your K8s cluster with your Akeyless authentication credentials which you can find more information on in the docs.
Method 2: K8s Secret Store (Used in this tutorial)
Before we continue, let's create a Namespace for our SecretStore and ExternalSecret to live in and a Service Account.
NoteWe are also creating a Service Account called my-sa in our namespace in order to authenticate with the JWT token for that specific Service Account.
Create a new Namespace and Service Account
kubectl create ns `<your-namespace-name>`kubectl create sa my-sa -n `<your-namespace-name>`Create the Akeyless SecretStore Provider
You can explicitly specify the secret details as described in the K8sSecretStore example below rather than creating the secret item inside your cluster by using your Akeyless Native Kubernetes Authentication, if you have it set up (see how that's done here: K8s Auth).
Create the file called 'K8sSecretStore.yaml' and add the following code.
apiVersion: external-secrets.io/v1beta1
kind: SecretStore
metadata:
  name: akeyless-secret-store
spec:
  provider:
    akeyless:
      # URL of your akeyless API
      akeylessGWApiURL: "https://api.akeyless.io"
      authSecretRef:
        kubernetesAuth:
          accessID: "p-XXXXXX"
          k8sConfName: "my-conf-name" # Found in your gateway
          # Optional service account field containing the name
          # of a kubernetes ServiceAccount
          serviceAccountRef:
            name: "my-sa"
Create the SecretStore.
kubectl apply -f K8sSecretStore.yaml -n `<your-namespace-name>`
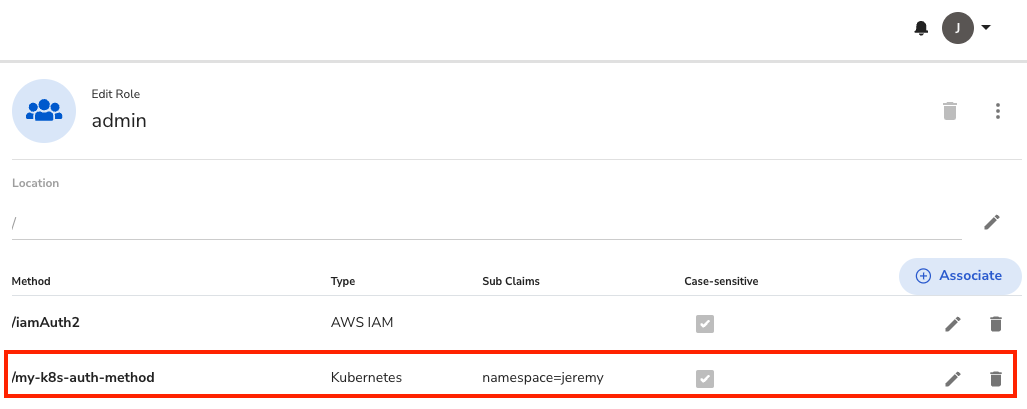
Security NoteIn order to ensure Least Privileged Access, it is important to ensure that the Access Role for the K8s Auth Method has a Sub-Claim to enforce that fetching the secret will only be possible from within a specific namespace.
This is optional, but you can do this by going to your console and choosing 'Access Roles' -> [Your Role Name] -> Click the pencil icon by [Your Auth Method] and add the Sub-Claim namespace=
<your-namespace-name>.
Creating the External Secret
Once you have your SecretStore and Namespace created, the next thing to do is fetch the secret from Akeyless and store it on the cluster.
Create a file called 'externalsecret.yaml' and fill in the /path/to/your/secret.
apiVersion: external-secrets.io/v1beta1
kind: ExternalSecret
metadata:
  name: akeyless-external-secret-example
spec:
  refreshInterval: 1h

  secretStoreRef:
    kind: SecretStore
    name: akeyless-secret-store # Must match SecretStore on the cluster

  target:
    name: akeyless-secret-to-create # Name for the secret to be created on the cluster
    creationPolicy: Owner

  data:
    - secretKey: secretKey # Key given to the secret to be created on the cluster
      remoteRef:
        key: /path/to/your/secret # Full path of the secret on Akeyless
Next, create the External Secret item in the new Namespace.
kubectl apply -f externalsecret.yaml -n `<your-namespace-name>`You can get the secret using the following command:
kubectl get secret akeyless-secret-to-create -n `<your-namespace-name>` -o jsonpath='{.data.secretKey}' | base64 -dYou can use the 'DataFrom' option for the ExternalSecret item as well. That info can be found in the docs.
Updated over 1 year ago