
Kubernetes Authentication
Deeper DiveFor more in-depth information, check out our detailed documentation on the following topics:
Kubernetes Authentication
Need any help?If something in this tutorial isn't working as expected, feel free to contact our support team via Slack.
Below is a text-only guide for users based on the above video
Why use Kubernetes Native Authentication?
Kubernetes Authentication is valuable for two main reasons:
- It’s native and easier to work with for Kubernetes workloads
- It enables much more specific and drill-down policy segregation and permissions for namespaces, pods, and more which is not available on native Kubernetes.
InfoThe Akeyless Kubernetes Auth Method uses the Kubernetes JWT token in order to authenticate the Kubernetes application (e.g. a pod). Throughout the process, this JWT is never shared with Akeyless or any other third party, but only with the Gateway that is controlled and operated on the customer environment. It is therefore considered a trusted machine.
Prerequisites
- Akeyless Gateway with network access to Kubernetes cluster.
- Kubernetes version 1.21 and higher.
Kubernetes Authentication Process
Let's go through the process for this demo.
-
First, you need your Kubernetes cluster already running and accessible as well as your Akeyless gateway.
-
We then Create a ServiceAccount in Kubernetes and give it permissions to access the Token Review API. This ServiceAccount will be used to validate a Kubernetes token coming from a pod that will try to authenticate to Akeyless.
-
Next, we will create a long-lived secret in Kubernetes and use that to extract the ServiceAccount token to use in later. This token is needed so that external systems or applications such as Akeyless can authenticate with the Kubernetes API server using that specific service account's identity and permissions.
-
We then extract the Cluster CA Certificate to use later as well. This is the public key certificate used by the Kubernetes cluster's Certificate Authority to sign certificates, allowing external applications like Akeyless to verify that they are securely communicating with your actual, trusted Kubernetes API server and not an impostor.
-
Next, we extract the ServiceAccount Token Issuer to use later as well. This is the URL that the Kubernetes API server embeds into the tokens it generates, allowing external systems like Akeyless to verify exactly which trusted Kubernetes cluster generated the token.
-
Then we create an Authentication Method in Akeyless. This auth method configures Akeyless to trust your cluster and defines the rules workloads must match to authenticate and access secrets.
-
Next, we create our Kubernetes Auth Config in Akeyless by plugging in all the data we saved from Steps 3 through 6. Now, uh-kee liss knows exactly how to securely reach the Kubernetes cluster and communicate with it.
-
Finally, we will authenticate to a Pod inside the cluster in order to be able to interact with it. We create a namespace and pod, start a shell session in the pod, install the Akeyless CLI and then run the final authentication command which returns an Akeyless Token.
The end result is the establishment of a secure trust relationship between Kubernetes and your Akeyless gateway.
Instead of hardcoding a master password, API key, or static credential inside your application pods (which is a massive security risk), your pods can now use their native, ephemeral Kubernetes identity to prove who they are to Akeyless.
And now you can use Akeyless to inject secrets into your Kubernetes pods, use this in your CI/CD pipelines and more. So let's get started in the step-by-step section.
Create service account for Akeyless Gateway
In general, token request projection will work on a managed K8s cluster. In this demo, we are using Amazon EKS.
For a Rancher cluster, please see thedocs for more information.
Open your terminal and create a new file called akl_gw_token_reviewer.yaml on your local machine by copying and pasting the below.
cat << EOF > akl_gw_token_reviewer.yaml
apiVersion: v1
kind: ServiceAccount
metadata:
  name: gateway-token-reviewer
  namespace: default
---
apiVersion: rbac.authorization.k8s.io/v1
kind: ClusterRoleBinding
metadata:
  name: role-tokenreview-binding
  namespace: default
roleRef:
  apiGroup: rbac.authorization.k8s.io
  kind: ClusterRole
  name: system:auth-delegator
subjects:
- kind: ServiceAccount
  name: gateway-token-reviewer
  namespace: default
EOF
Next, create the service account, called gateway-token-reviewer, by running the below command:
kubectl apply -f akl_gw_token_reviewer.yamlBearer Token Extraction for K8s Server v1.24 or higher
For Kubernetes Server Version 1.23 or Older, see thedocs
Create a service account secret by copying and pasting the following in your terminal which creates a file called akl_gw_token_reviewer_token.yaml:
cat <<EOF > akl_gw_token_reviewer_token.yaml
apiVersion: v1
kind: Secret
metadata:
  name: gateway-token-reviewer-token
  namespace: default
  annotations:
    kubernetes.io/service-account.name: gateway-token-reviewer
type: kubernetes.io/service-account-token
EOF
Then, run 'kubectl apply' to create the secret:
kubectl apply -f akl_gw_token_reviewer_token.yamlNext, extract the service account JWT Bearer Token (K8s >=v1.24) and save it as an environment variable:
SA_JWT_TOKEN=$(kubectl get secret gateway-token-reviewer-token \
  --output 'go-template={{.data.token | base64decode}}')
Feel free to check that this worked by running the following:
echo $SA_JWT_TOKENExtract K8s Cluster CA Certificate
Extract the K8s cluster CA certificate used to talk to Kubernetes API and save it as an environment variable with the following command:
CA_CERT=$(kubectl config view --raw --minify --flatten  \
    --output 'jsonpath={.clusters[].cluster.certificate-authority-data}')
Create Kubernetes Auth Method
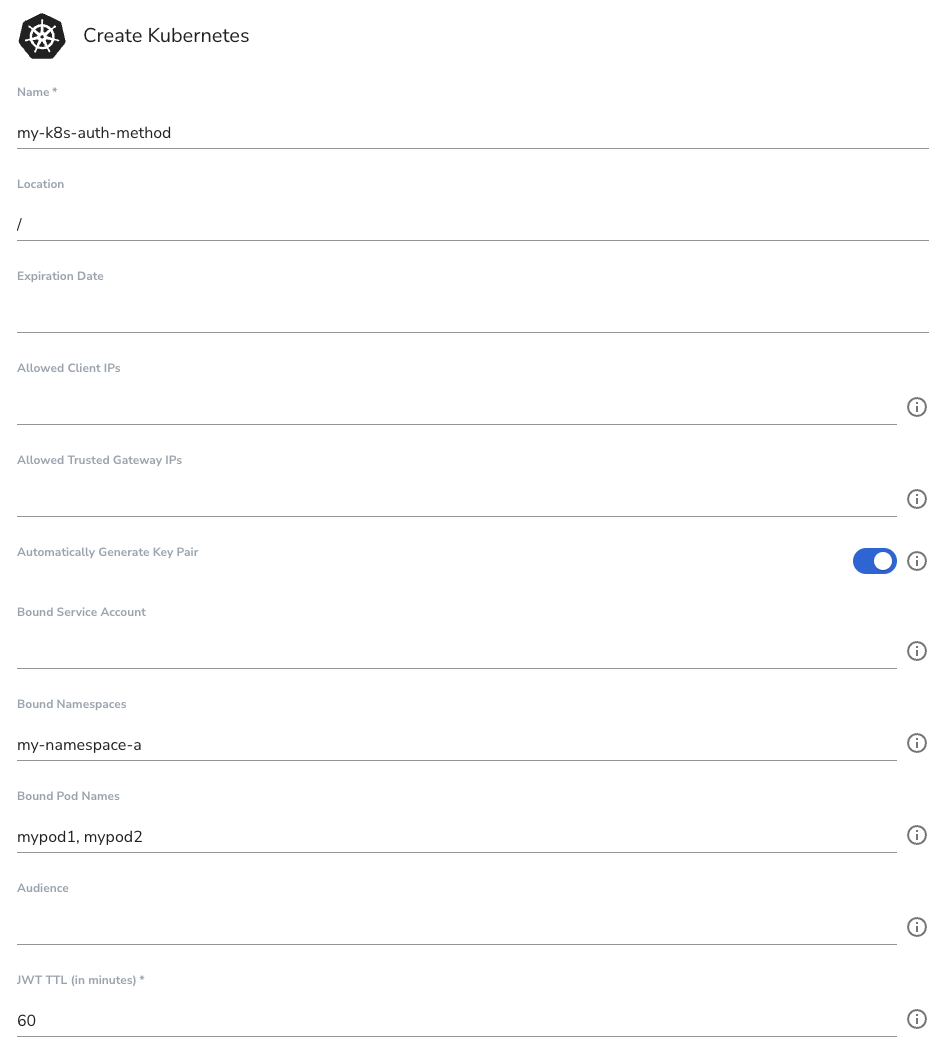
Create the Kubernetes Authentication Method either in the UI or CLI. This will be bound to pods mypod1 and mypod2 and the namespace my-name-space-a.
In the UI:
In the CLI:
akeyless create-auth-method-k8s -n my-k8s-auth-method --bound-pod-names mypod1 \
    --bound-pod-names mypod2 --bound-namespaces my-namespace-a --json
TipSave returned private key & AccessID for next steps inside an environment variables $PRV_KEY and $ACCESS_ID.
ACCESS_ID=[access-id-here]
PRV_KEY=[private-key-here]
Create Kubernetes Auth Config on your Gateway
Open a new tab and run the following command to start the server which allows access to the Kubernetes API server from within a cluster:
kubectl proxy --api-prefix=/k8s-apiNext, extract the Kubernetes OIDC Issuer saved as an environment variable.
NoteJQ needs to be installed for this to work.
K8S_ISSUER=$(curl -s http://localhost:8001/k8s-api/.well-known/openid-configuration | jq -r .issuer)You can now close the server connection by closing the tab.
Create the auth config within the Gateway by running the following command for a Kubernetes native cluster. You will notice our saved environment variables here:
NoteFor a Rancher cluster, see the docs.
akeyless gateway-create-k8s-auth-config --name k8s-conf \
--gateway-url <https://Your-GW-URL>:8000 \
--access-id $ACCESS_ID \
--signing-key $PRV_KEY \
--k8s-host=<https://Your-K8s-Cluster-IP:8443> \
--token-reviewer-jwt $SA_JWT_TOKEN \
--k8s-ca-cert $CA_CERT \
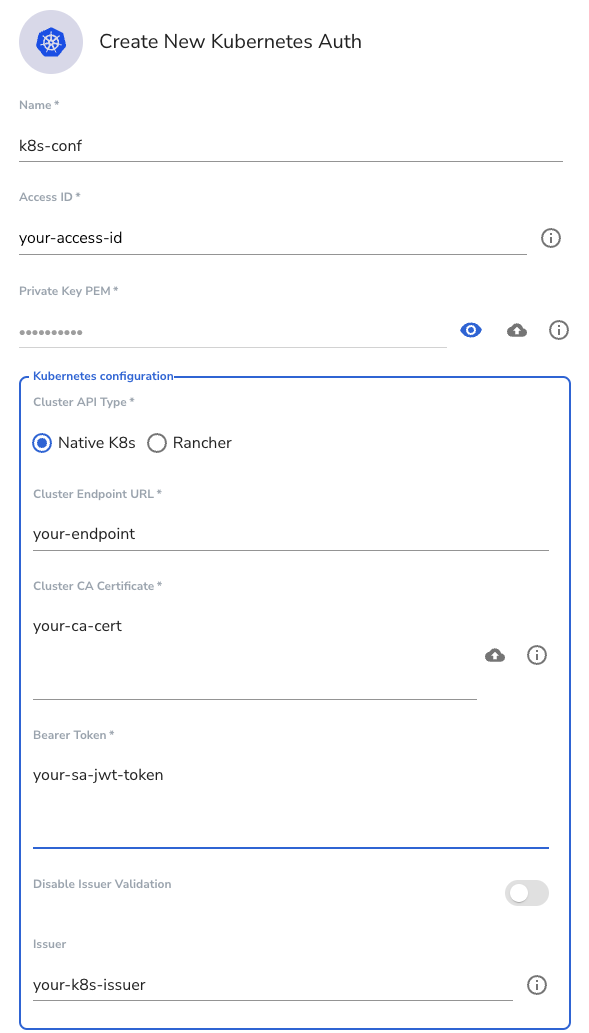
--k8s-issuer $K8S_ISSUERThe same thing can be done directly through your Gateway UI by going to the Gateway URL and clicking on the 'Kubernetes Auth' menu item, clicking 'New', and adding your details as follows:
Authenticate from a service account in your Kubernetes cluster
Create the namespace in your Kubernetes cluster that matches the restrictions in our auth method:
kubectl create namespace my-namespace-aCreate a pod inside that namesapce that matches a restricted pod as per our auth method:
kubectl run mypod1 --image=nginx -n my-namespace-aStart an interactive shell session on the pod and perform the following commands in the pod:
kubectl exec --stdin=true --namespace my-namespace-a --tty=true mypod1 -- /bin/shInstall Akeyless CLI inside your pod:
curl -o akeyless https://akeyless-cli.s3.us-east-2.amazonaws.com/cli/latest/production/cli-linux-amd64
chmod +x akeyless
Authenticate via your Kubernetes auth method with the following:
./akeyless auth --access-id $ACCESS_ID \
    --access-type k8s \
    --gateway-url https://<Your-GW-URL>:8000 \
    --k8s-auth-config-name k8s-conf
NoteThe first attempt at running the above command might just run a fresh install of the CLI. In that case, type 'n' and 'n' for the first two prompts and run the command again.
Upon successful authentication, you will receive a response like this:
Authentication succeeded.
Token: t-bb7b...3564a7c9
ImportantUnset the Private Key and Access ID which you stored as an environment variables $PRV_KEY and $ACCESS_ID by running unset VARIABLE_NAME.
Updated about 2 months ago