
Certificate Issuance, Provisioning, and Storage
Deeper DiveFor more in-depth information, check out our detailed documentation on the following topics:
Tokenization
Need any help?If something in this tutorial isn't working as expected, feel free to contact our support team via Slack.
Below is a text-only guide for users based on the above video
What is a Certificate?
A certificate is a type of digital secret, but unlike other secrets, it contains extensive data used to verify the authenticity of a digital entity, such as a website, device, or other identity. When that entity has a valid certificate, your communication with that endpoint is secure and encrypted. For example, in WhatsApp your conversations are fully encrypted, so if a hacker extracts your conversations, they can’t decrypt them. They will just see a bunch of gibberish.
The validity of a certificate is determined by a third-party organization called a Public Certificate Authority (CA), whose trust is universally recognized. A little bit more on this later. This verification ensures that digital assets are legitimate and reduces the risk of various attacks.
SSL/TLS certificates, which use the TLS protocol, form the foundation for encryption, protecting data exchanged between users and websites. Essentially, a certificate enables secure transmission of data. With a valid certificate, a website or other digital identity ensures that hackers cannot decrypt the data sent between the client and the server.
What we will cover in this tutorial
In this example, we are requesting a public certificate to be issued from ZeroSSL with account credentials. We will then create a PKI Certificate Issuer in Akeyless to issue the TLS certificate which we will then automatically provision to our server which will then make our website TLS secured (https).
Prerequisites
- An Akeyless Gateway to interact with the Public Certificate Authority.
- Target of the public CA.
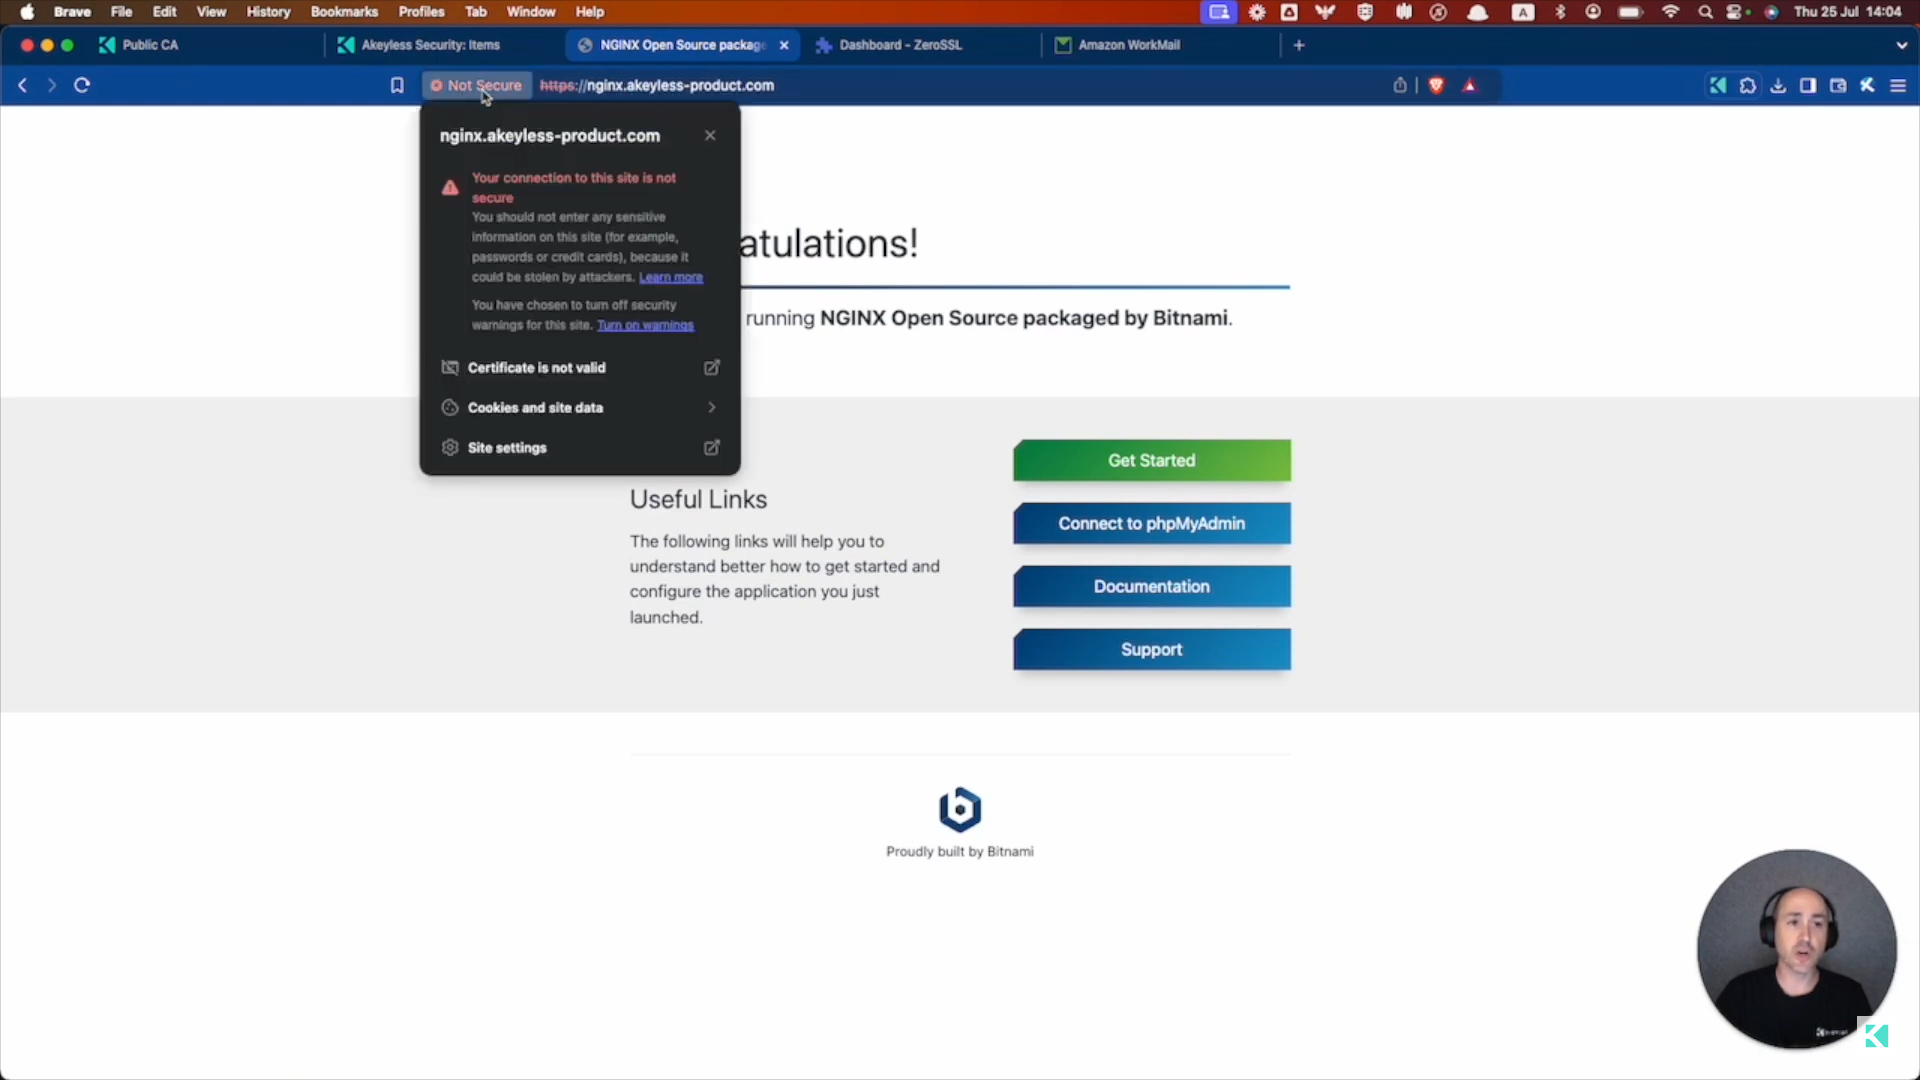
We also have a website that is currently not secure:
Create a Target for ZeroSSL
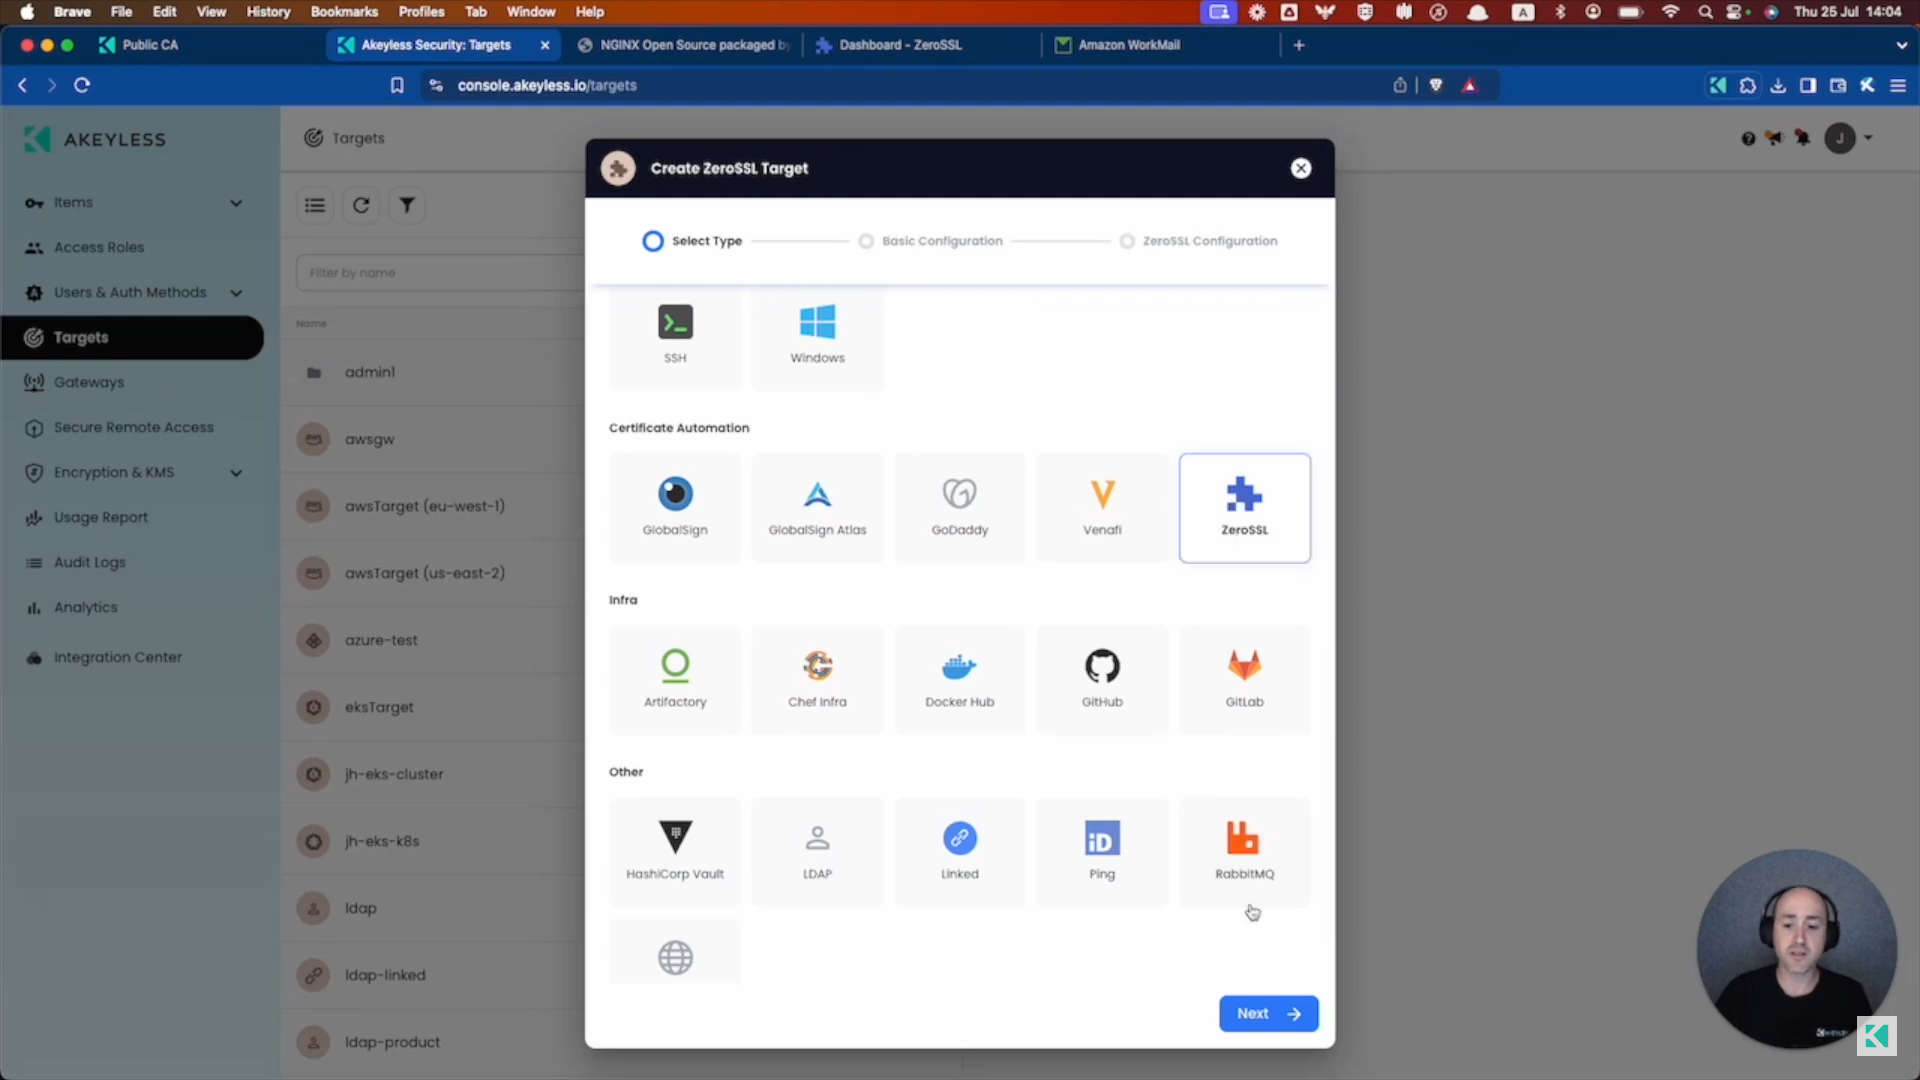
In the Akeyless Console, click on Targets -> New -> ZeroSSL and click "Next".
Add the Target name (and folder, if relevant) and click "Next".
Enter your ZeroSSL API Key, IMAP Username (username to access your IMAP service), IMAP Password (password to access your IMAP service), IMAP FQDN (FQDN of the IMAP service), IMAP Port, and IMAP Validation Email (if it's different than the username).
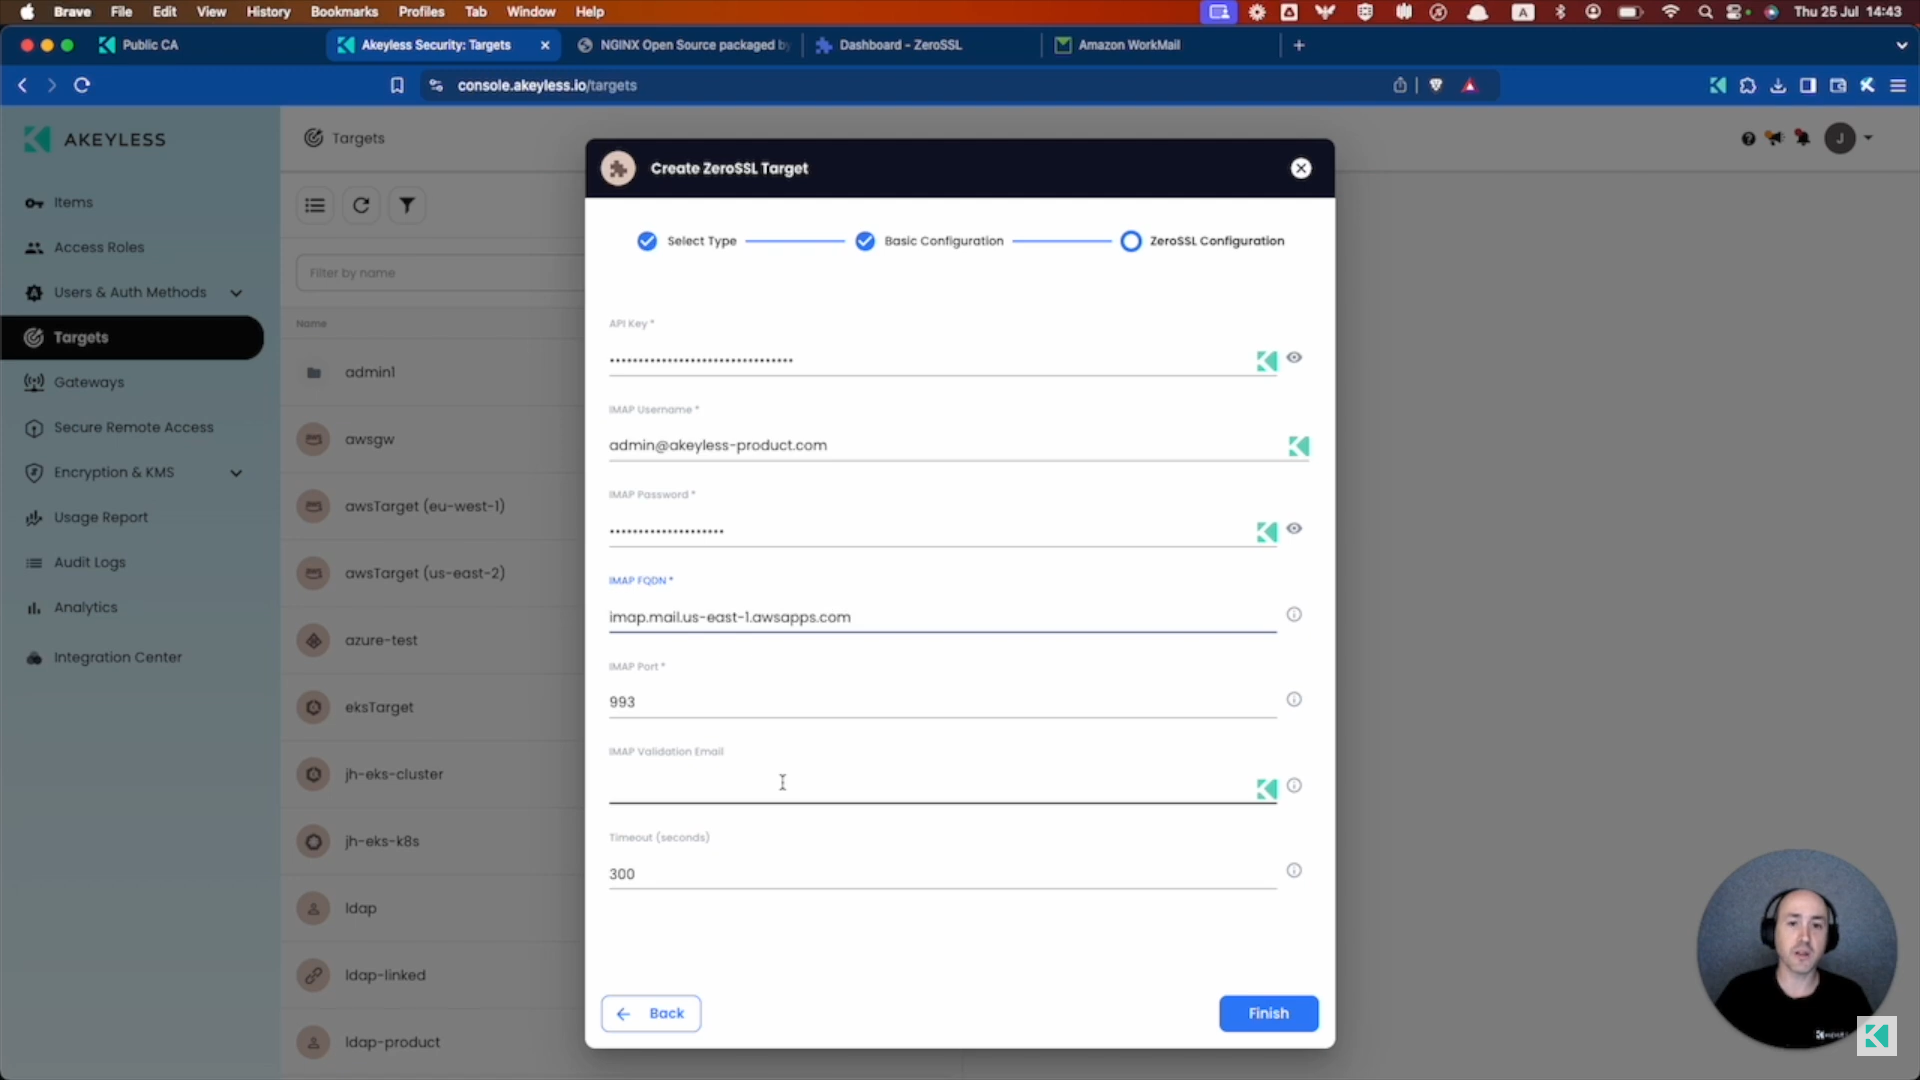
Then click "Finish".
Create PKI Certificate Issuer for ZeroSSL Target
In the Akeyless Console, click on Items -> New -> PKI Cert Issuer and click "Next".
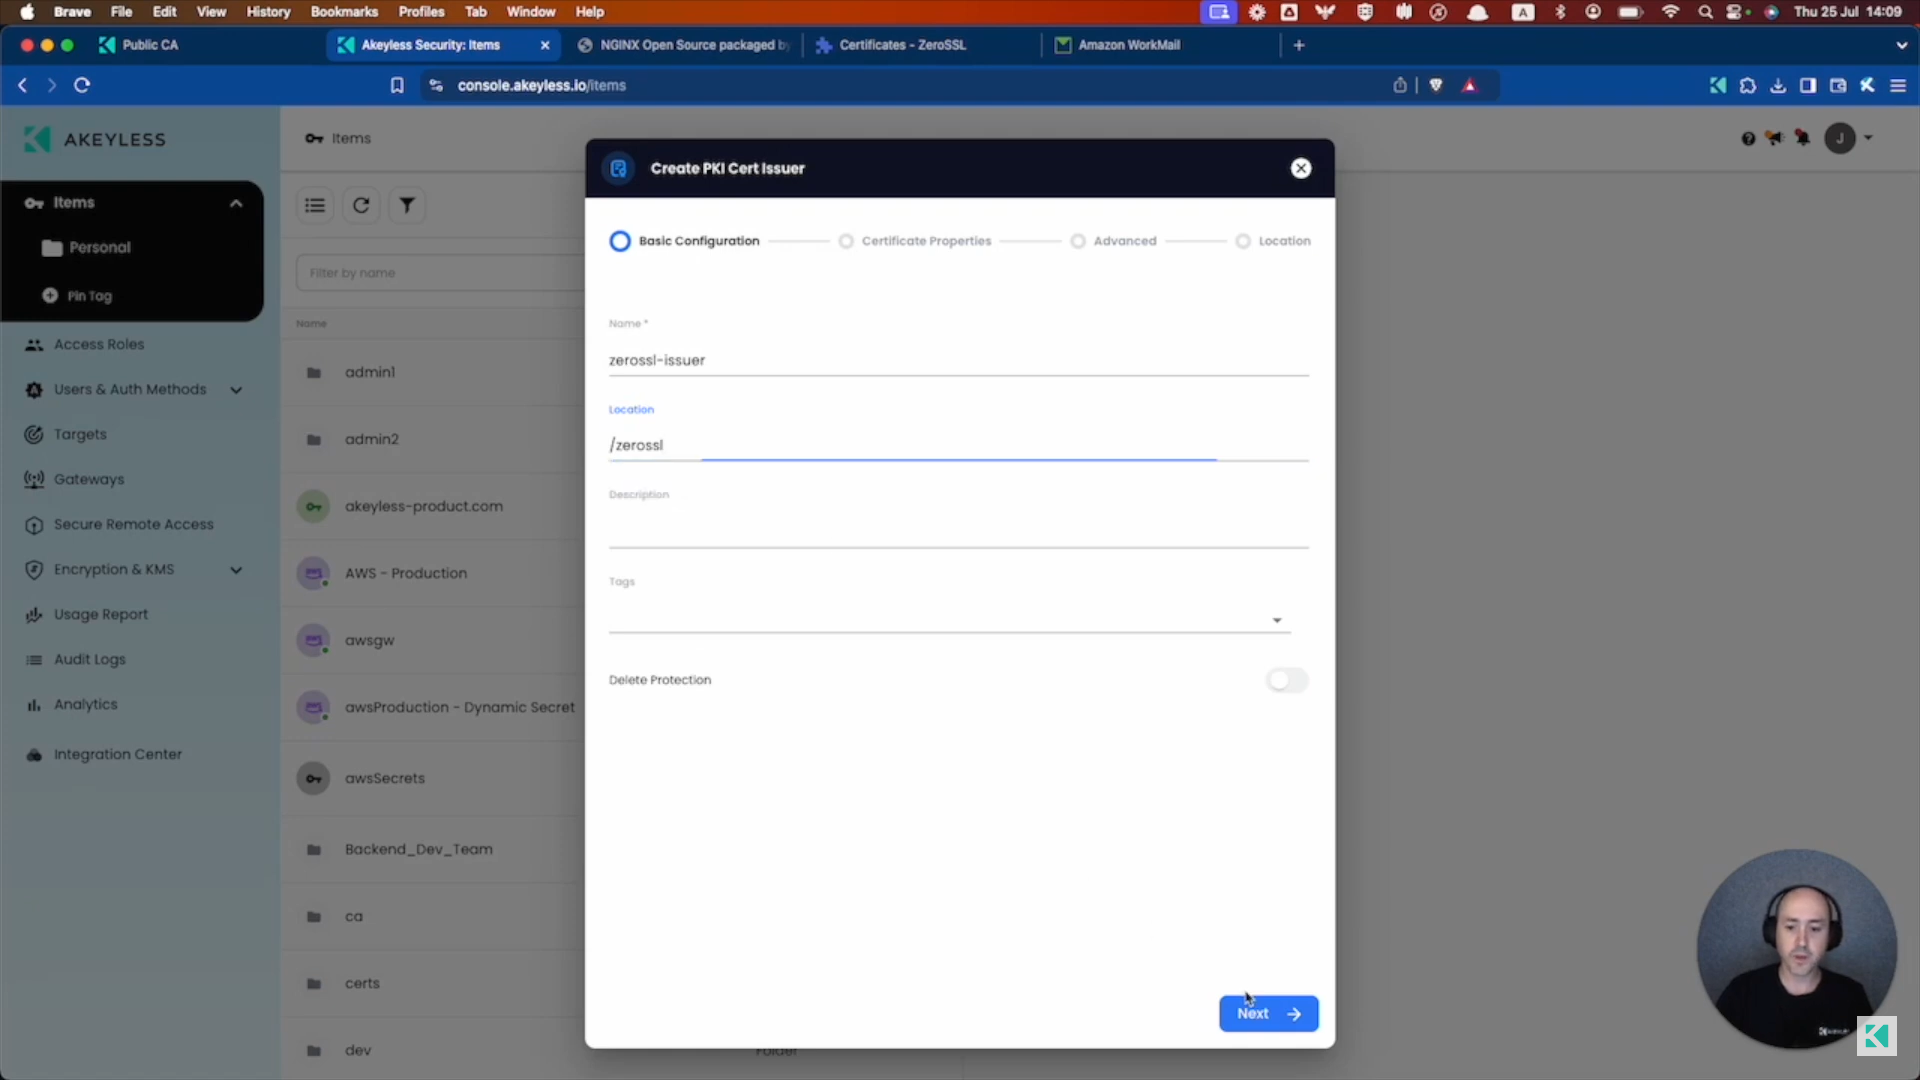
Add the Item name (and folder, if relevant) and click "Next".
Choose Public under Certificate Authority, pick your Target name from the list, choose your Gateway, TTL, and ensure your server domain is in the Allowed Domains list.
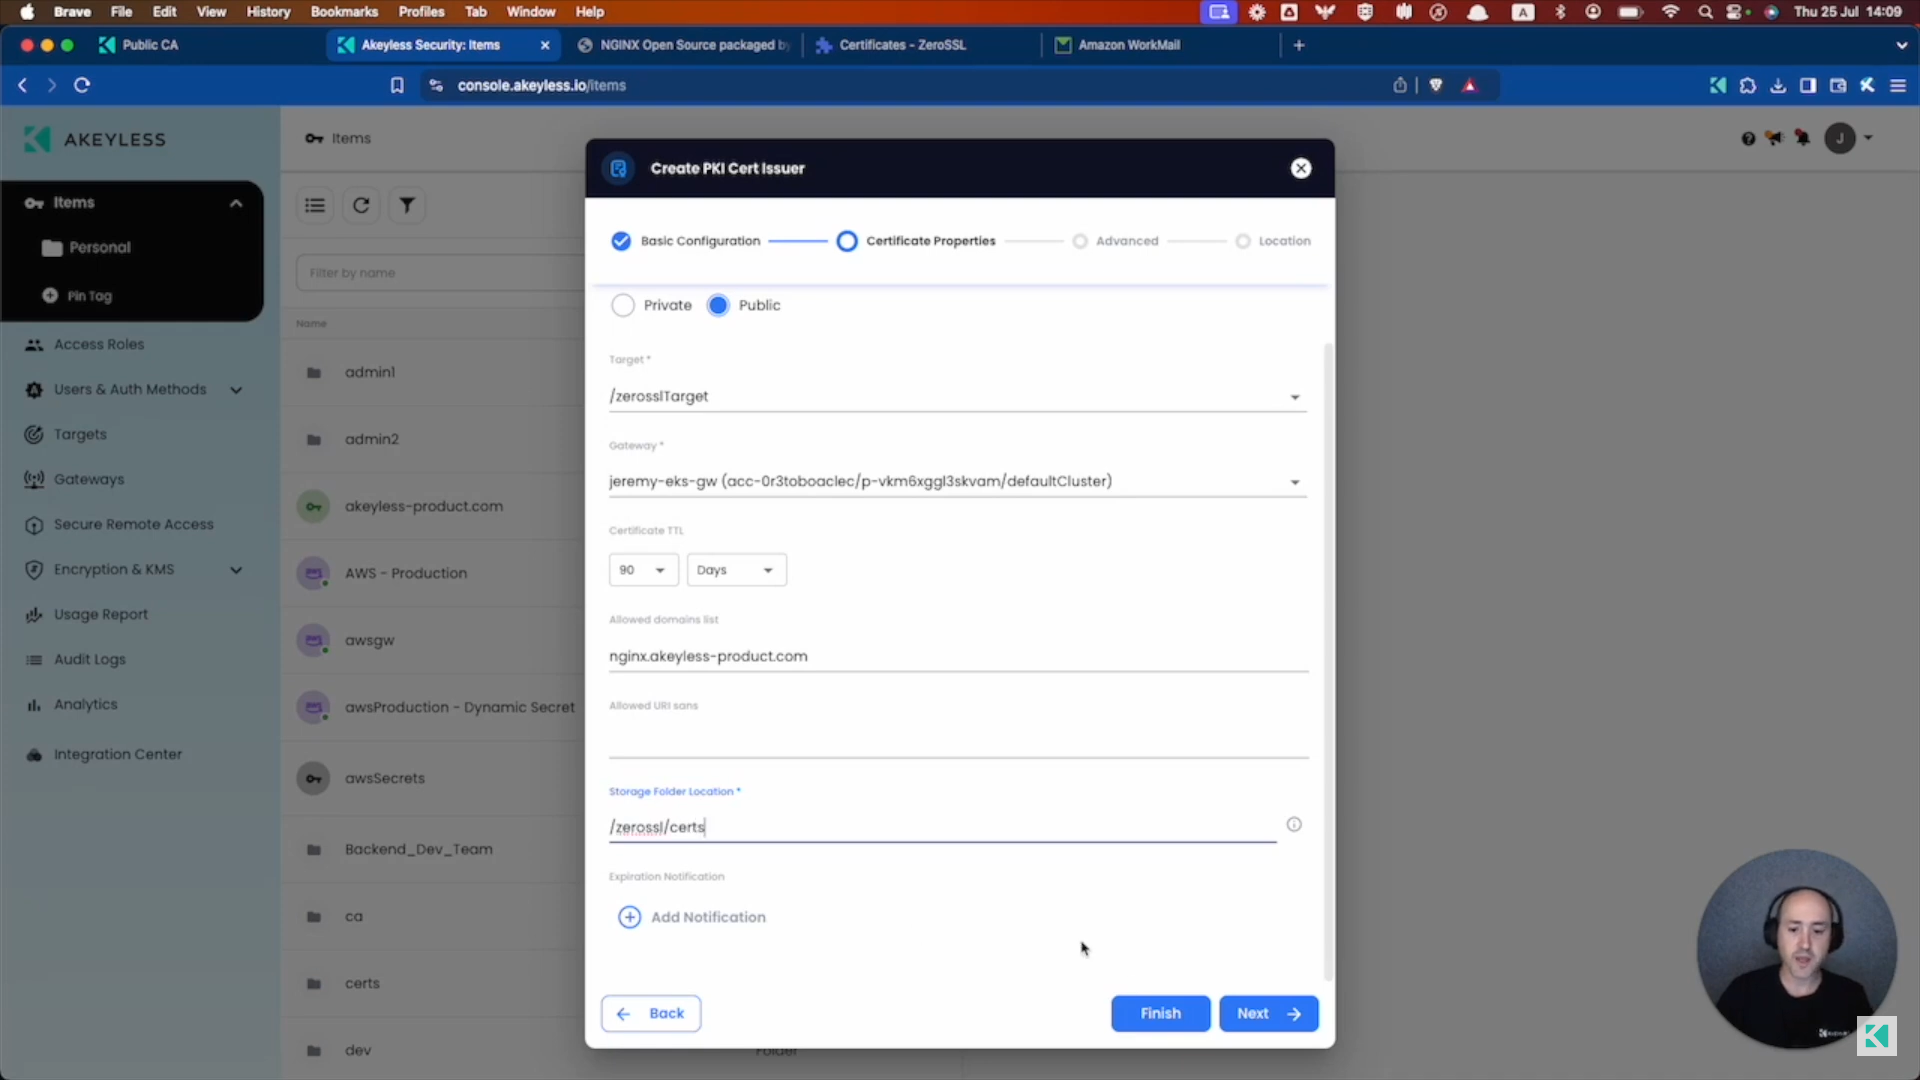
Feel free to choose a Storage Folder Location as well for the location the certificates will be created in.
Issue a Certificate
In order to generate a certificate, you will need a Certificate Signing Request (CSR). You can do this with Akeyless as well by using the following command:
akeyless generate-csr --name <classic-encryption-key-name> --generate-key --alg <RSA2048> --common-name <common name to include in CSR> --gateway-url <https://akeyless-gateway-url:8000> --export-private-key trueYou will receive output that looks like this:
-----BEGIN CERTIFICATE REQUEST-----
MIICzjCCAbYCAQAwXDEJMAcGA1UEBhMAMQkwBwYDVQQIEwAxCTAHBgNVBAcTADEJ
MAcGA1UEChMAMQkwBwYDVQQLEwAxIzAhBgNVBAMTGm5naW54LmFrZXlsZXNzLXBy
b2R1Y3QuY29tMIIBIjANBgkqhkiG9w0BAQEFAAOCAQ8AMIIBCgKCAQEArKjVqJlo
OCYpql7arMifyM0IGjkZPaiEvqNhyaoJR1VUTZN/BioQoYRuNuzXRoXKa18pNHVU
Za0aDW06Ke8K0Fk7Vrqlrta/rS3xPLJja7BaqanSMZOh3ADsh5ZXepCxs2CYwgJe
U9gPNwtSOM/0uoYIvNaslC157yCXI2DKjLzrzpqd9IqYf6b06GaZtlT2mOTWGf6l
xLMsRSzUcAaoOPUA+F7jJwTfGPJtZeZfgfU3HpODni+hadxN85TtzJHjANWmTz33
xGuGgskyB6ly66LYprxOBsWAuYKfvfcE0NWv1rMqZFF7A3mewSI8jr7p92WKlqQZ
ySyV5oMwYY4IZQIDAQABoC0wKwYJKoZIhvcNAQkOMR4wHDANBgNVHREEBjAEggCB
ADALBgNVHQ8EBAMCAAAwDQYJKoZIhvcNAQELBQADggEBAADrNKFI9J7tTDc6dCh7
VVK6ad0e+HqU
-----END CERTIFICATE REQUEST-----
-----BEGIN RSA PRIVATE KEY-----
MIIEpQIBAAKCAQEArKjVqJloOCYpql7arMifyM0IGjkZPaiEvqNhyaoJR1VUTZN/
BioQoYRuNuzXRoXKa18pNHVUZa0aDW06Ke8K0Fk7Vrqlrta/rS3xPLJja7BaqanS
MZOh3ADsh5ZXepCxs2CYwgJeU9gPNwtSOM/0uoYIvNaslC157yCXI2DKjLzrzpqd
9IqYf6b06GaZtlT2mOTWGf6lxLMsRSzUcAaoOPUA+F7jJwTfGPJtZeZfgfU3HpOD
ni+hadxN85TtzJHjANWmTz33xGuGgskyB6ly66LYprxOBsWAuYKfvfcE0NWv1rMq
ZFF7A3mewSI8jr7p92WKlqQZySyV5oMwYY4IZQIDAQABAoIBAQClHI+1u34+s8AE
fNEBipnCnM+yxAevPwgyhmttPn3BCYik5vgCHRfqXYpIXBVCC4+XPllZIRqkYPUZ
AestTrs4oxxrw/HNUO/b3KNlN/J7eRo6RXwMjPGsQfXvc4YUX2qP70Alx74M0AE8
0ka+rZ+K/8I7U8+VpCeG1dOysU0BZ9Xvfr5zdIHCMD+5J9+rtTJ4zfNb3oQ0jmG4
Uh0GZF6llLB17UNzAmqbF5F9CiWtRwnLGD/pgBw/CQPr8ApXD8k4ZQ+f+2ds2tFL
ETPaFbmghN7hddiEuvg4/vYITcQiAWgjPt1ZTPm4XIKhrPVmQn50iOk90EYBTuQD
1UUiR44BAoGBAN/7wrPjZXrd8LkzAmrtVBd+eREPvgC2yUU4S7pPV6g3Mo9kty83
7L229qisS6Vw99rrVJnEXjqmhIZchXVI6ZkEXQ6Zv67ZD/tN6J2W1qIKOPdlMPSU
foL/oTU8ytxGtasK5eJPC9FBZGqzLq1+kqT6FqFzflU3zN5xfwxF7OqpAoGBAMVW
+XNOTmZHxgqnLZMG4DNruOfVstJVZxlpmqBVncpwhkqUxoM+Ffu/bxIWfkkqffPA
mk1AGaluCBkzHV2wc0i2Bi/FqBUfoiLPCs3oc5Ougd45Skd+4HW0KkrG9RPjUEaG
furJWfn+YY9MkHM1VA1XuyZIfgxjRx74WBZJdSFdAoGBAN1SMkP6cG4GHDWD9+Gc
fTlx2UNIoOCnvR3O0NVaTS2EzUrvpCreQen8fqKRDXZ+uArz+naumMWvgMgbaCxK
TbjLnQAuYD/vcGFL
-----END RSA PRIVATE KEY-----
Copy only the Certificate Request section and go back to the Console.
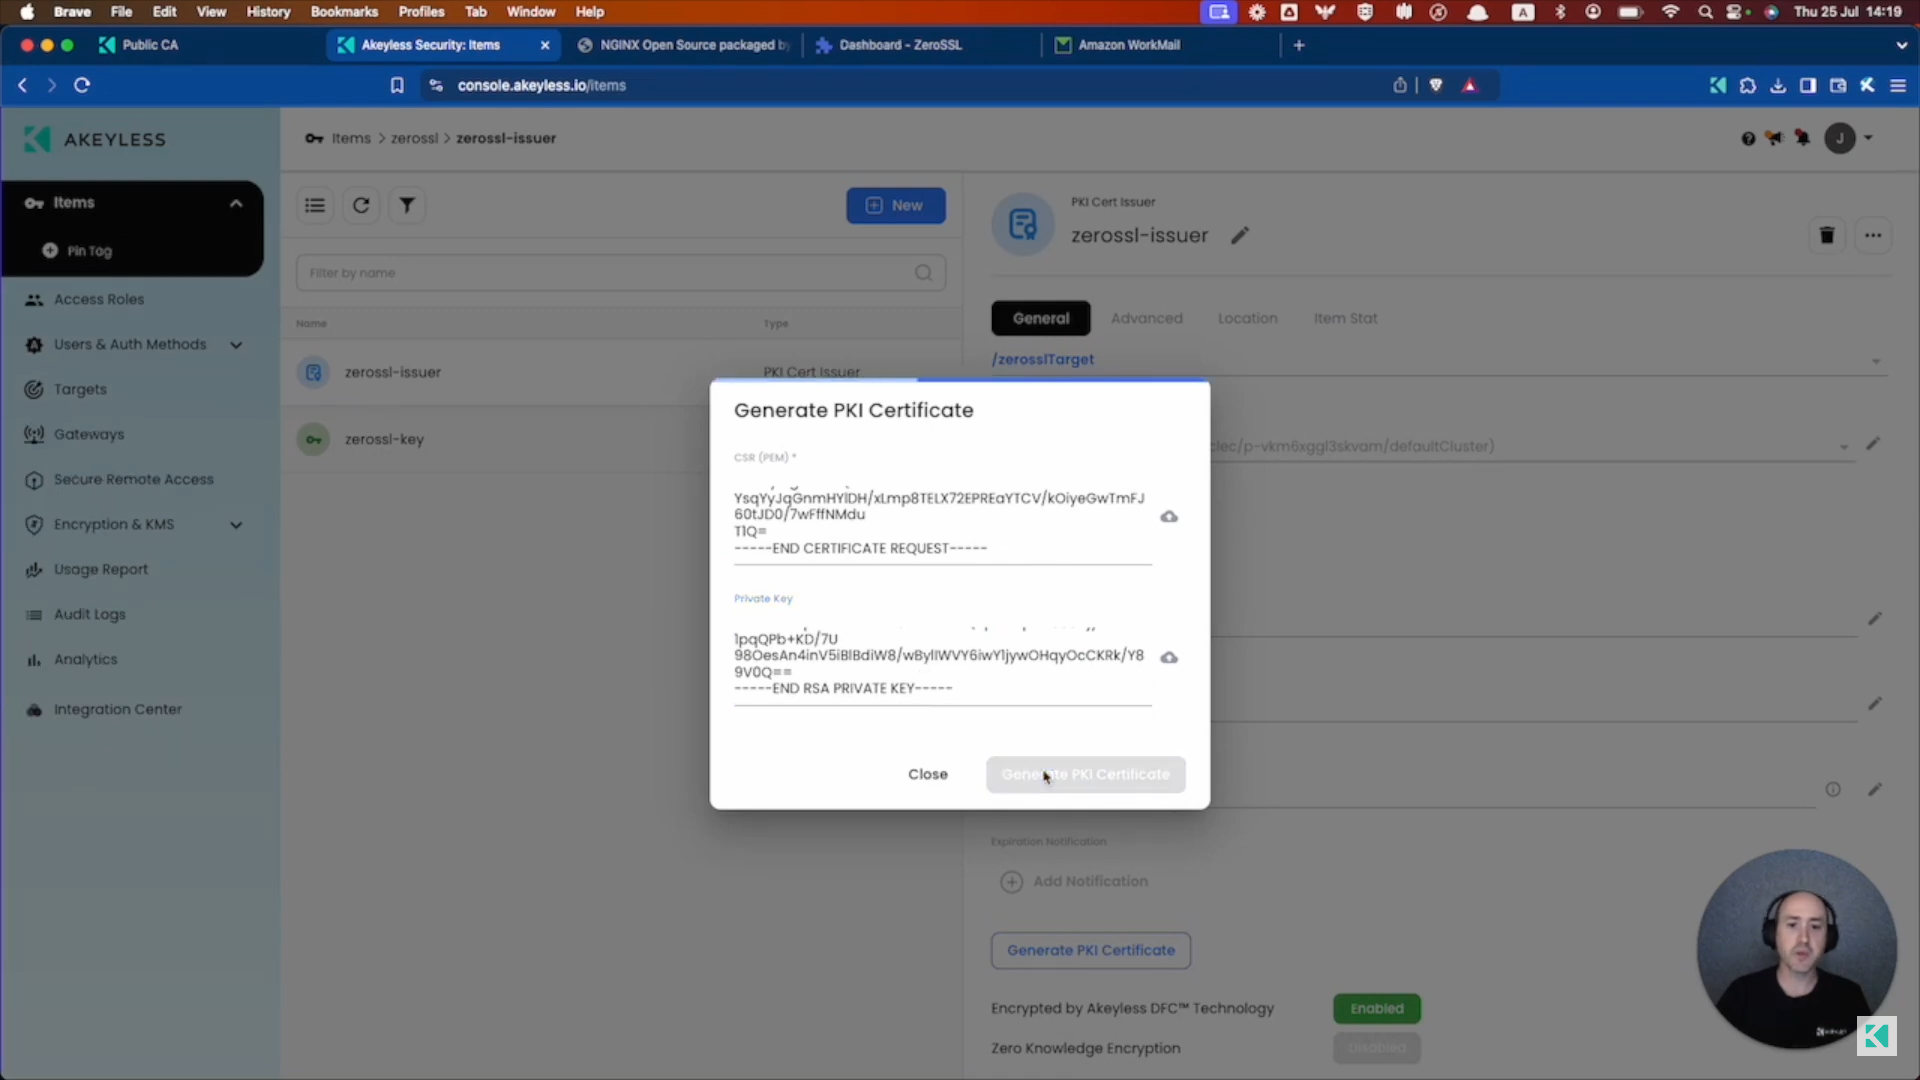
Find your Certificate Issuer and then click on the "Generate PKI Certificate" button. Paste what you copied into the CSR section, and you can optionally add in the Private Key as well which you have in the output, and then click "Generate PKI Certificate".
Once that is successful, you can refresh and you will find your certificate which will be in a "Pending" state.
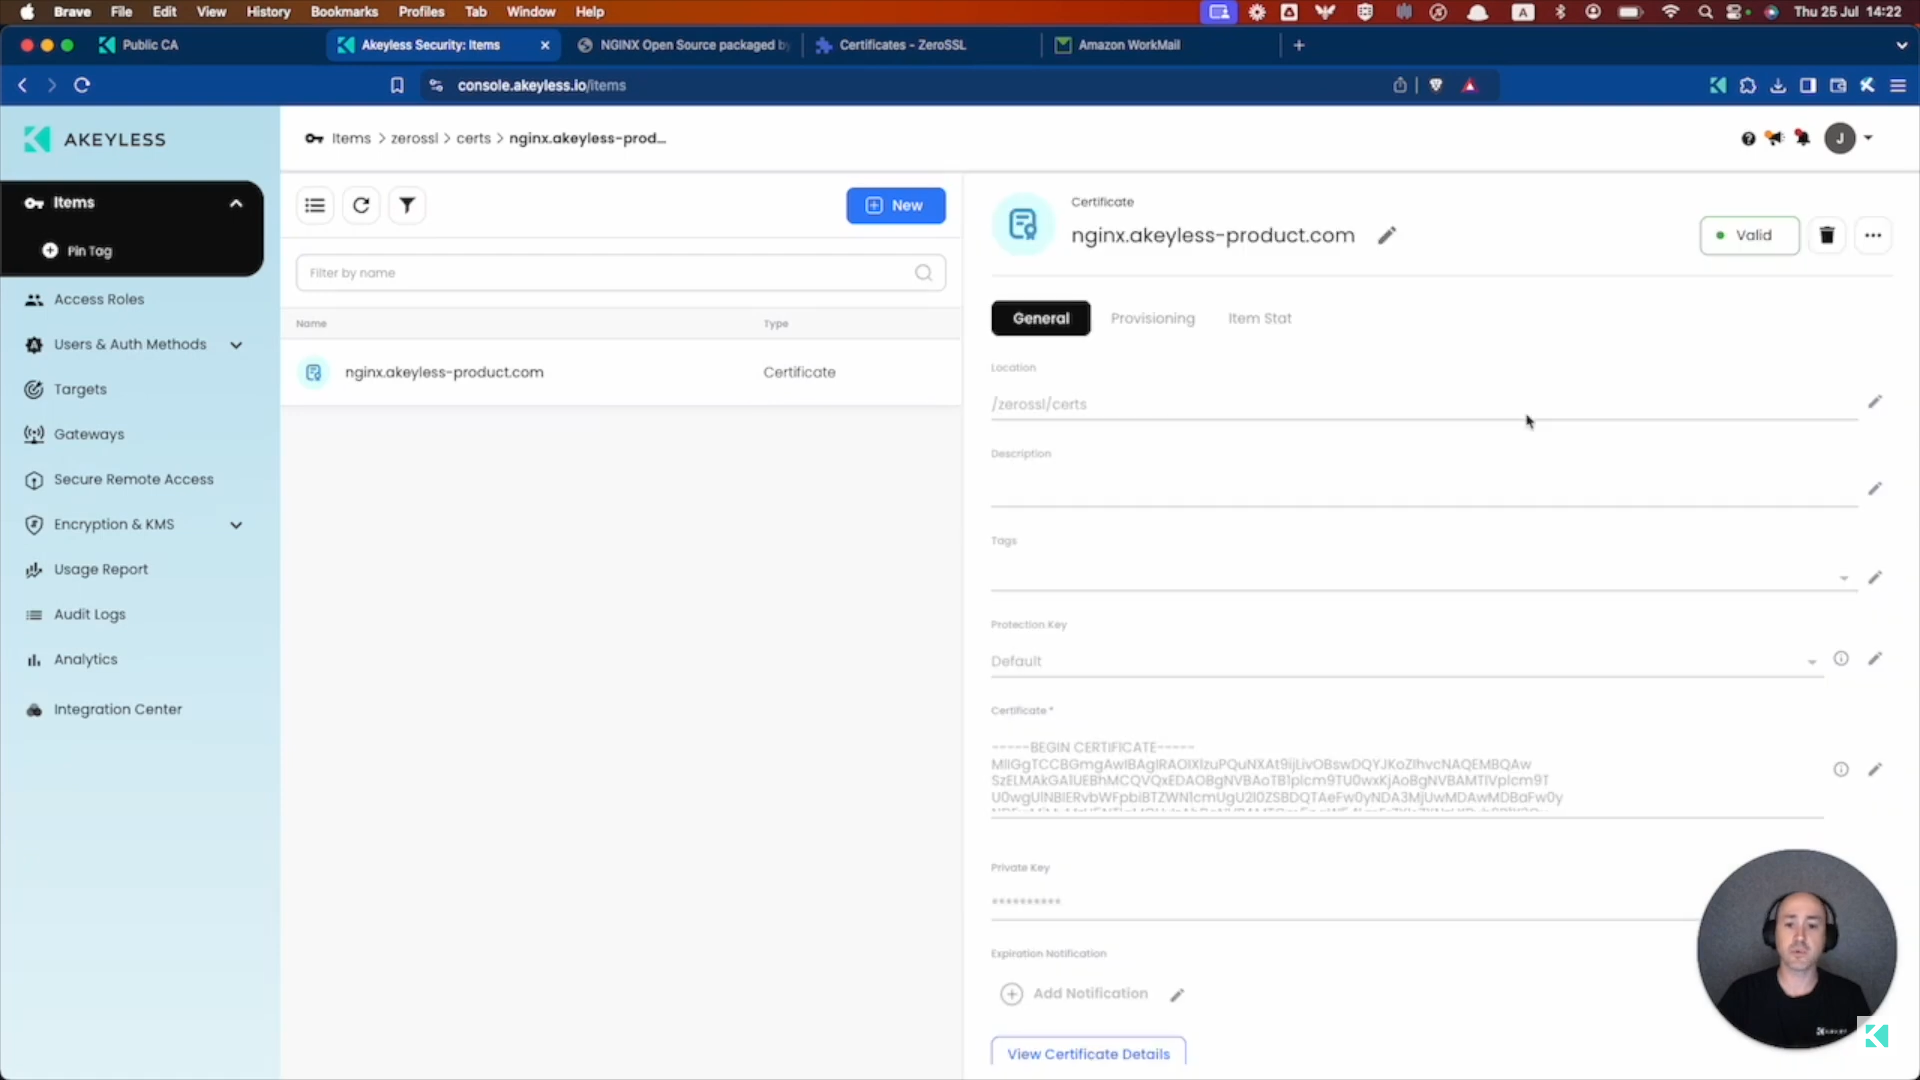
Within a few minutes, behind the scenes, your gateway will use your Target details to verify the domain for you automatically. And you can go back into your Akeyless account and see the Certificate is now "Valid".
Provision the Certificate to your server
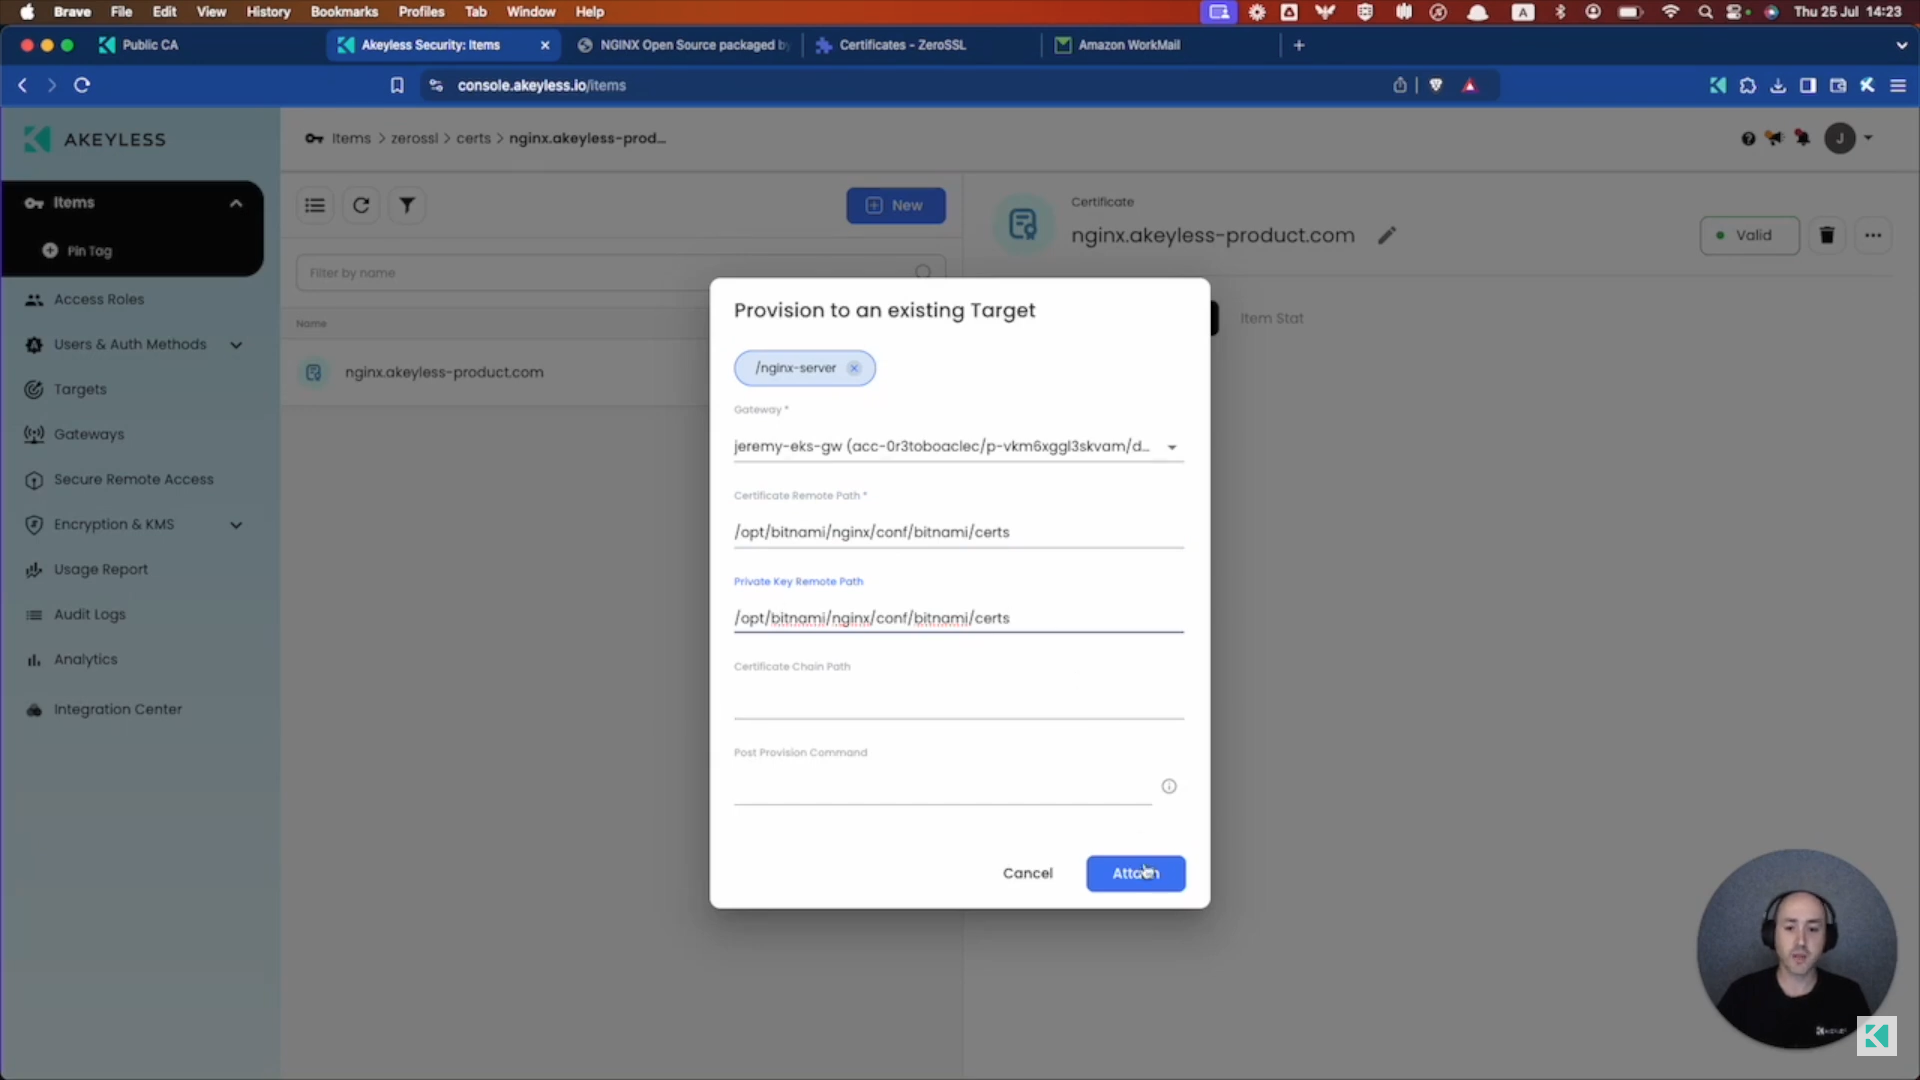
To provision the Certificate to your server, simply click on the Provisioning tab and click the "Attach" button.
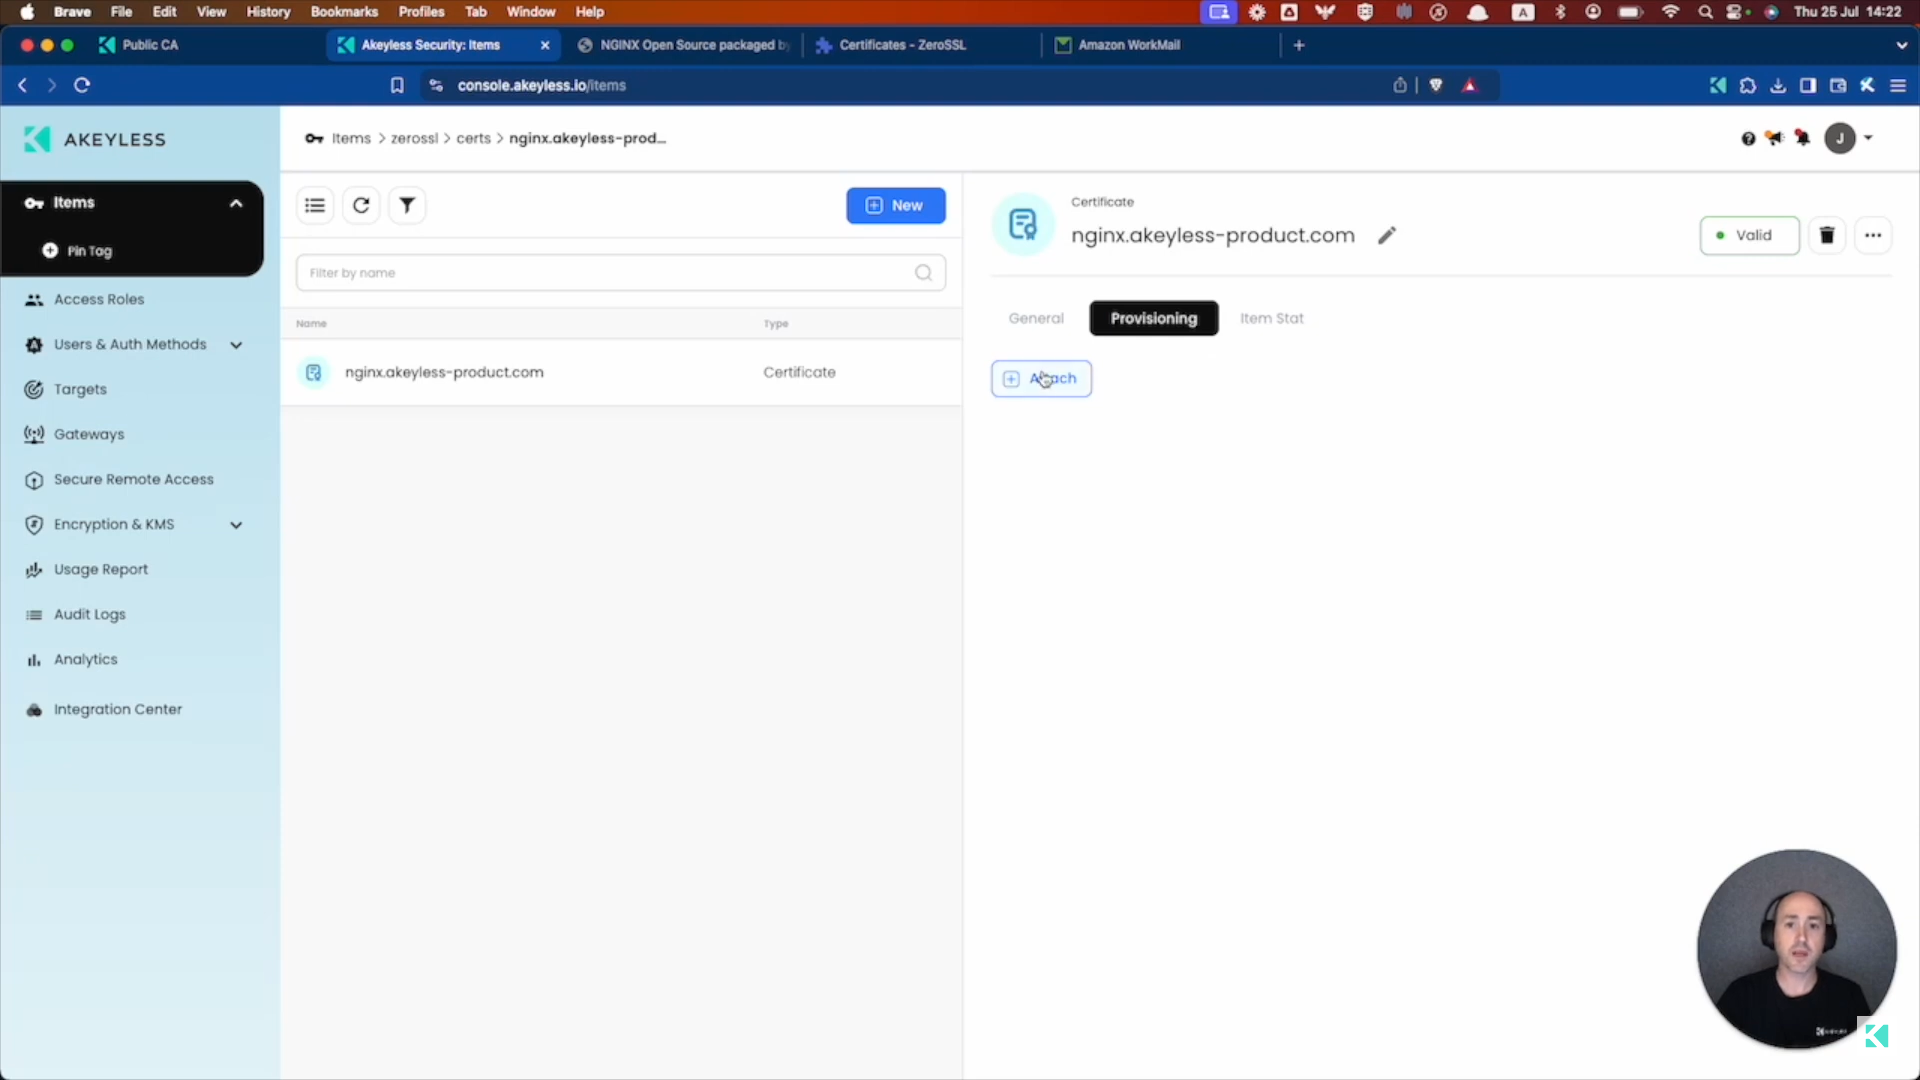
From there, choose your Target Name, Gateway, Certificate Remote Path (the path you want the certificate to be placed in on the remote server), Private Key Remote Path (the path you want the private key to be placed in on the remote server) and the click "Attach".
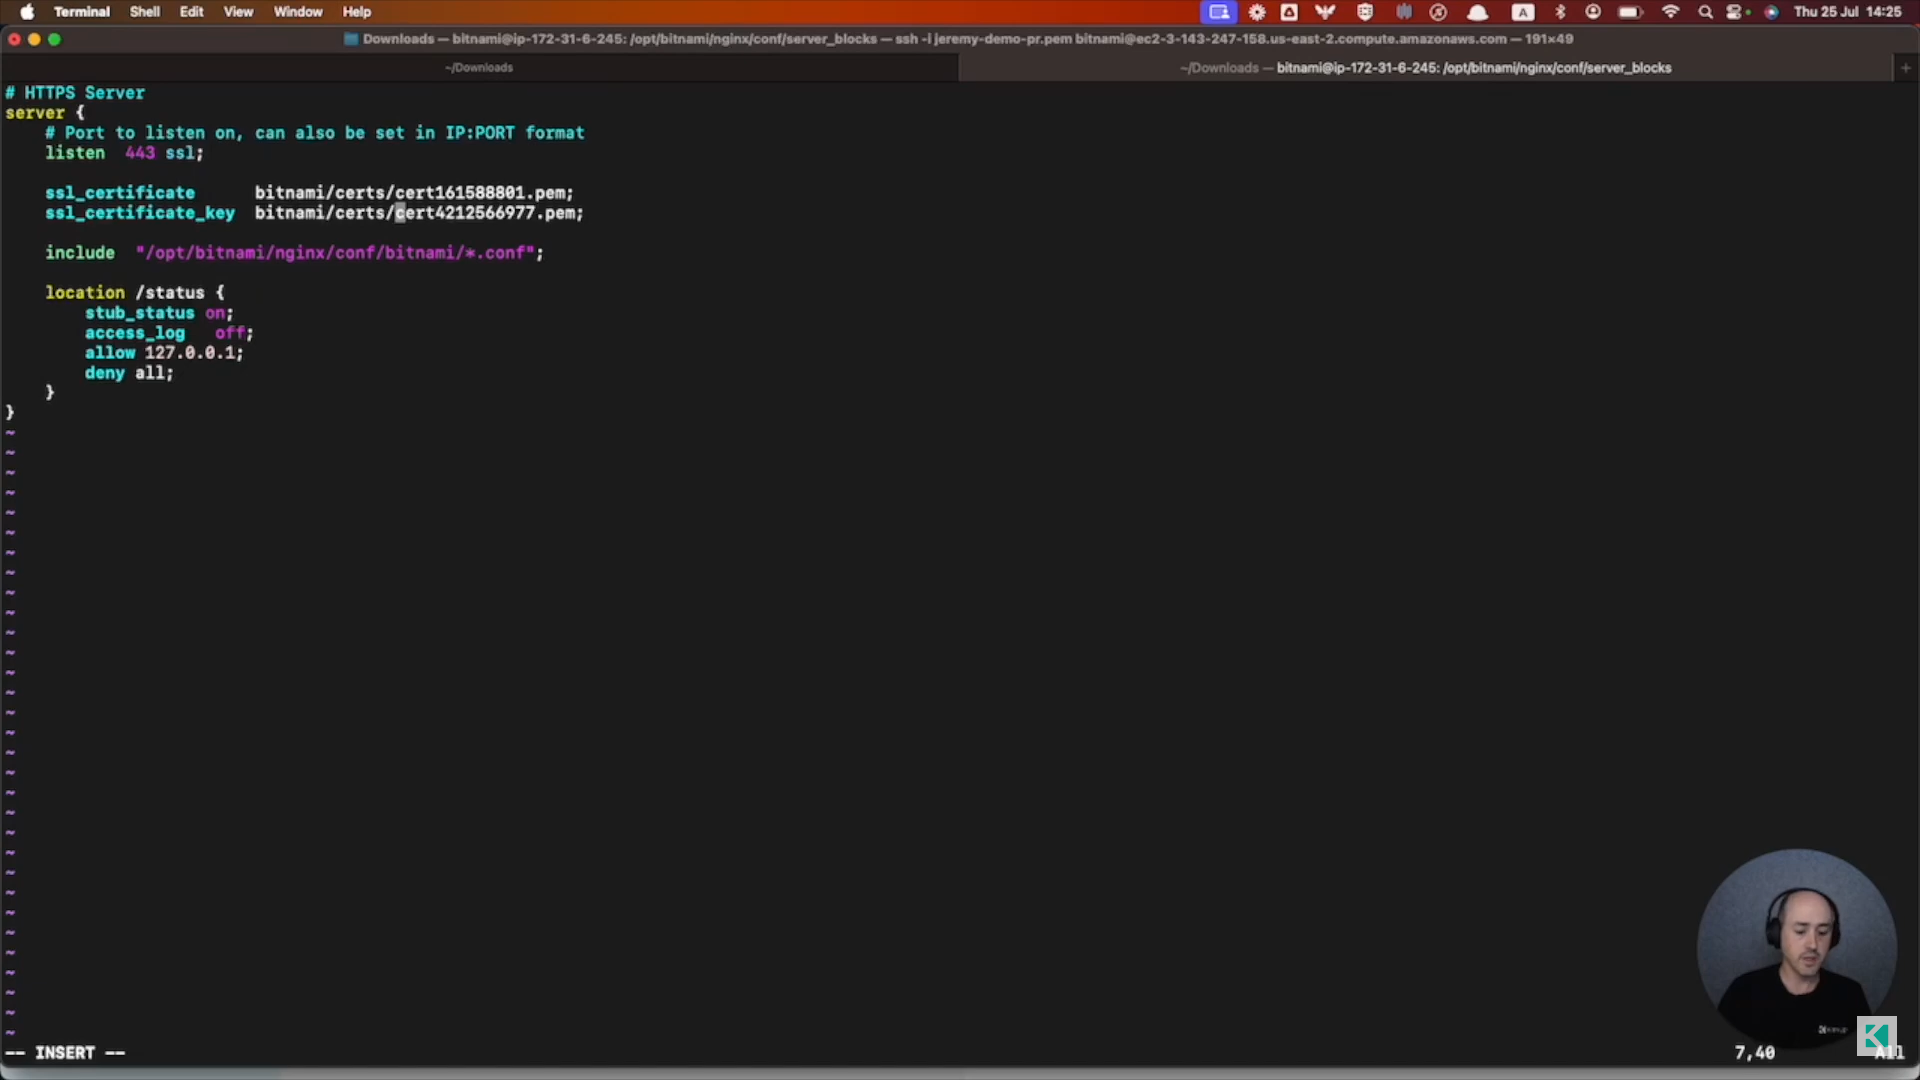
Going back to your server, you can run the list command to see your files in the path.
You can check the contents of one of the files to determine which is the Certificate and which is the Private Key. From there, just make sure you configure the server to use the files and reboot your server or restart the service.
Once that's done, you should be able to come back to your website, refresh the page, and see the site is now secured with TLS.
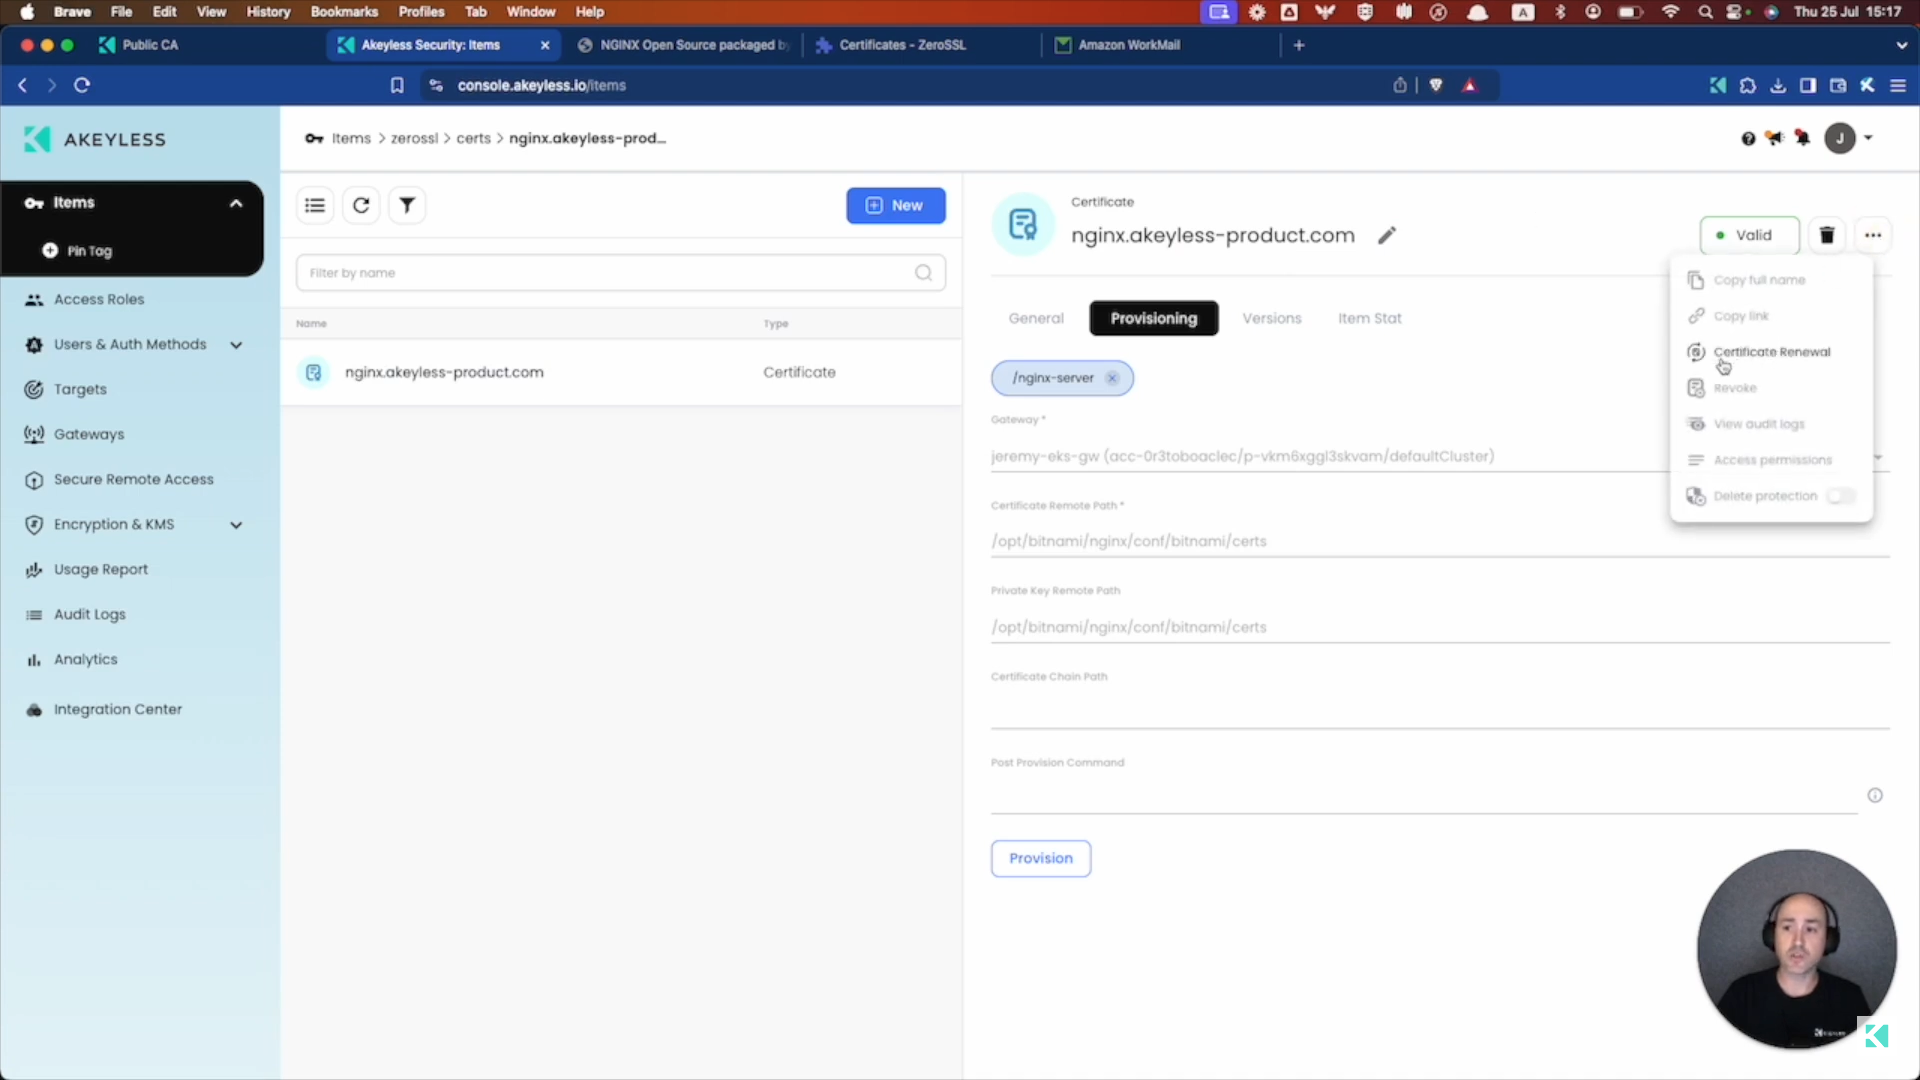
More Actions
You can also click on the 3 dots on the right hand side inside your Certificate to Renew the Certificate or Revoke the Certificate and add it to your Certificate Revocation List with just a few clicks.
Updated 3 months ago